
Users
Every person who accesses your FASTR instance needs a user account. This page covers how to add users, configure what they can do at the instance level, and assign them to specific projects with appropriate permissions.
Understanding the permission model
Section titled “Understanding the permission model”FASTR uses a two-level permission system. Instance-level permissions control what someone can do across the entire platform - things like viewing user lists, uploading data, or creating projects. Project-level permissions control what they can do within individual projects - viewing visualizations, running modules, or changing settings.
Instance administrators have full access to everything and don’t need individual permissions configured. For everyone else, you’ll set both instance permissions (what they can access globally) and project permissions (what they can do in each project they’re assigned to).
This separation means you can have someone who manages data uploads instance-wide but only has viewer access to certain projects, or someone who administers one project but has no access to another. The flexibility is useful when different teams work with different data or when you need to restrict sensitive analyses.
Adding users
Section titled “Adding users”Open the Users tab from the main navigation. Click Add users to open the add dialog. Enter one or more email addresses - you can paste a list separated by commas, semicolons, or line breaks. Click Add to create the accounts.
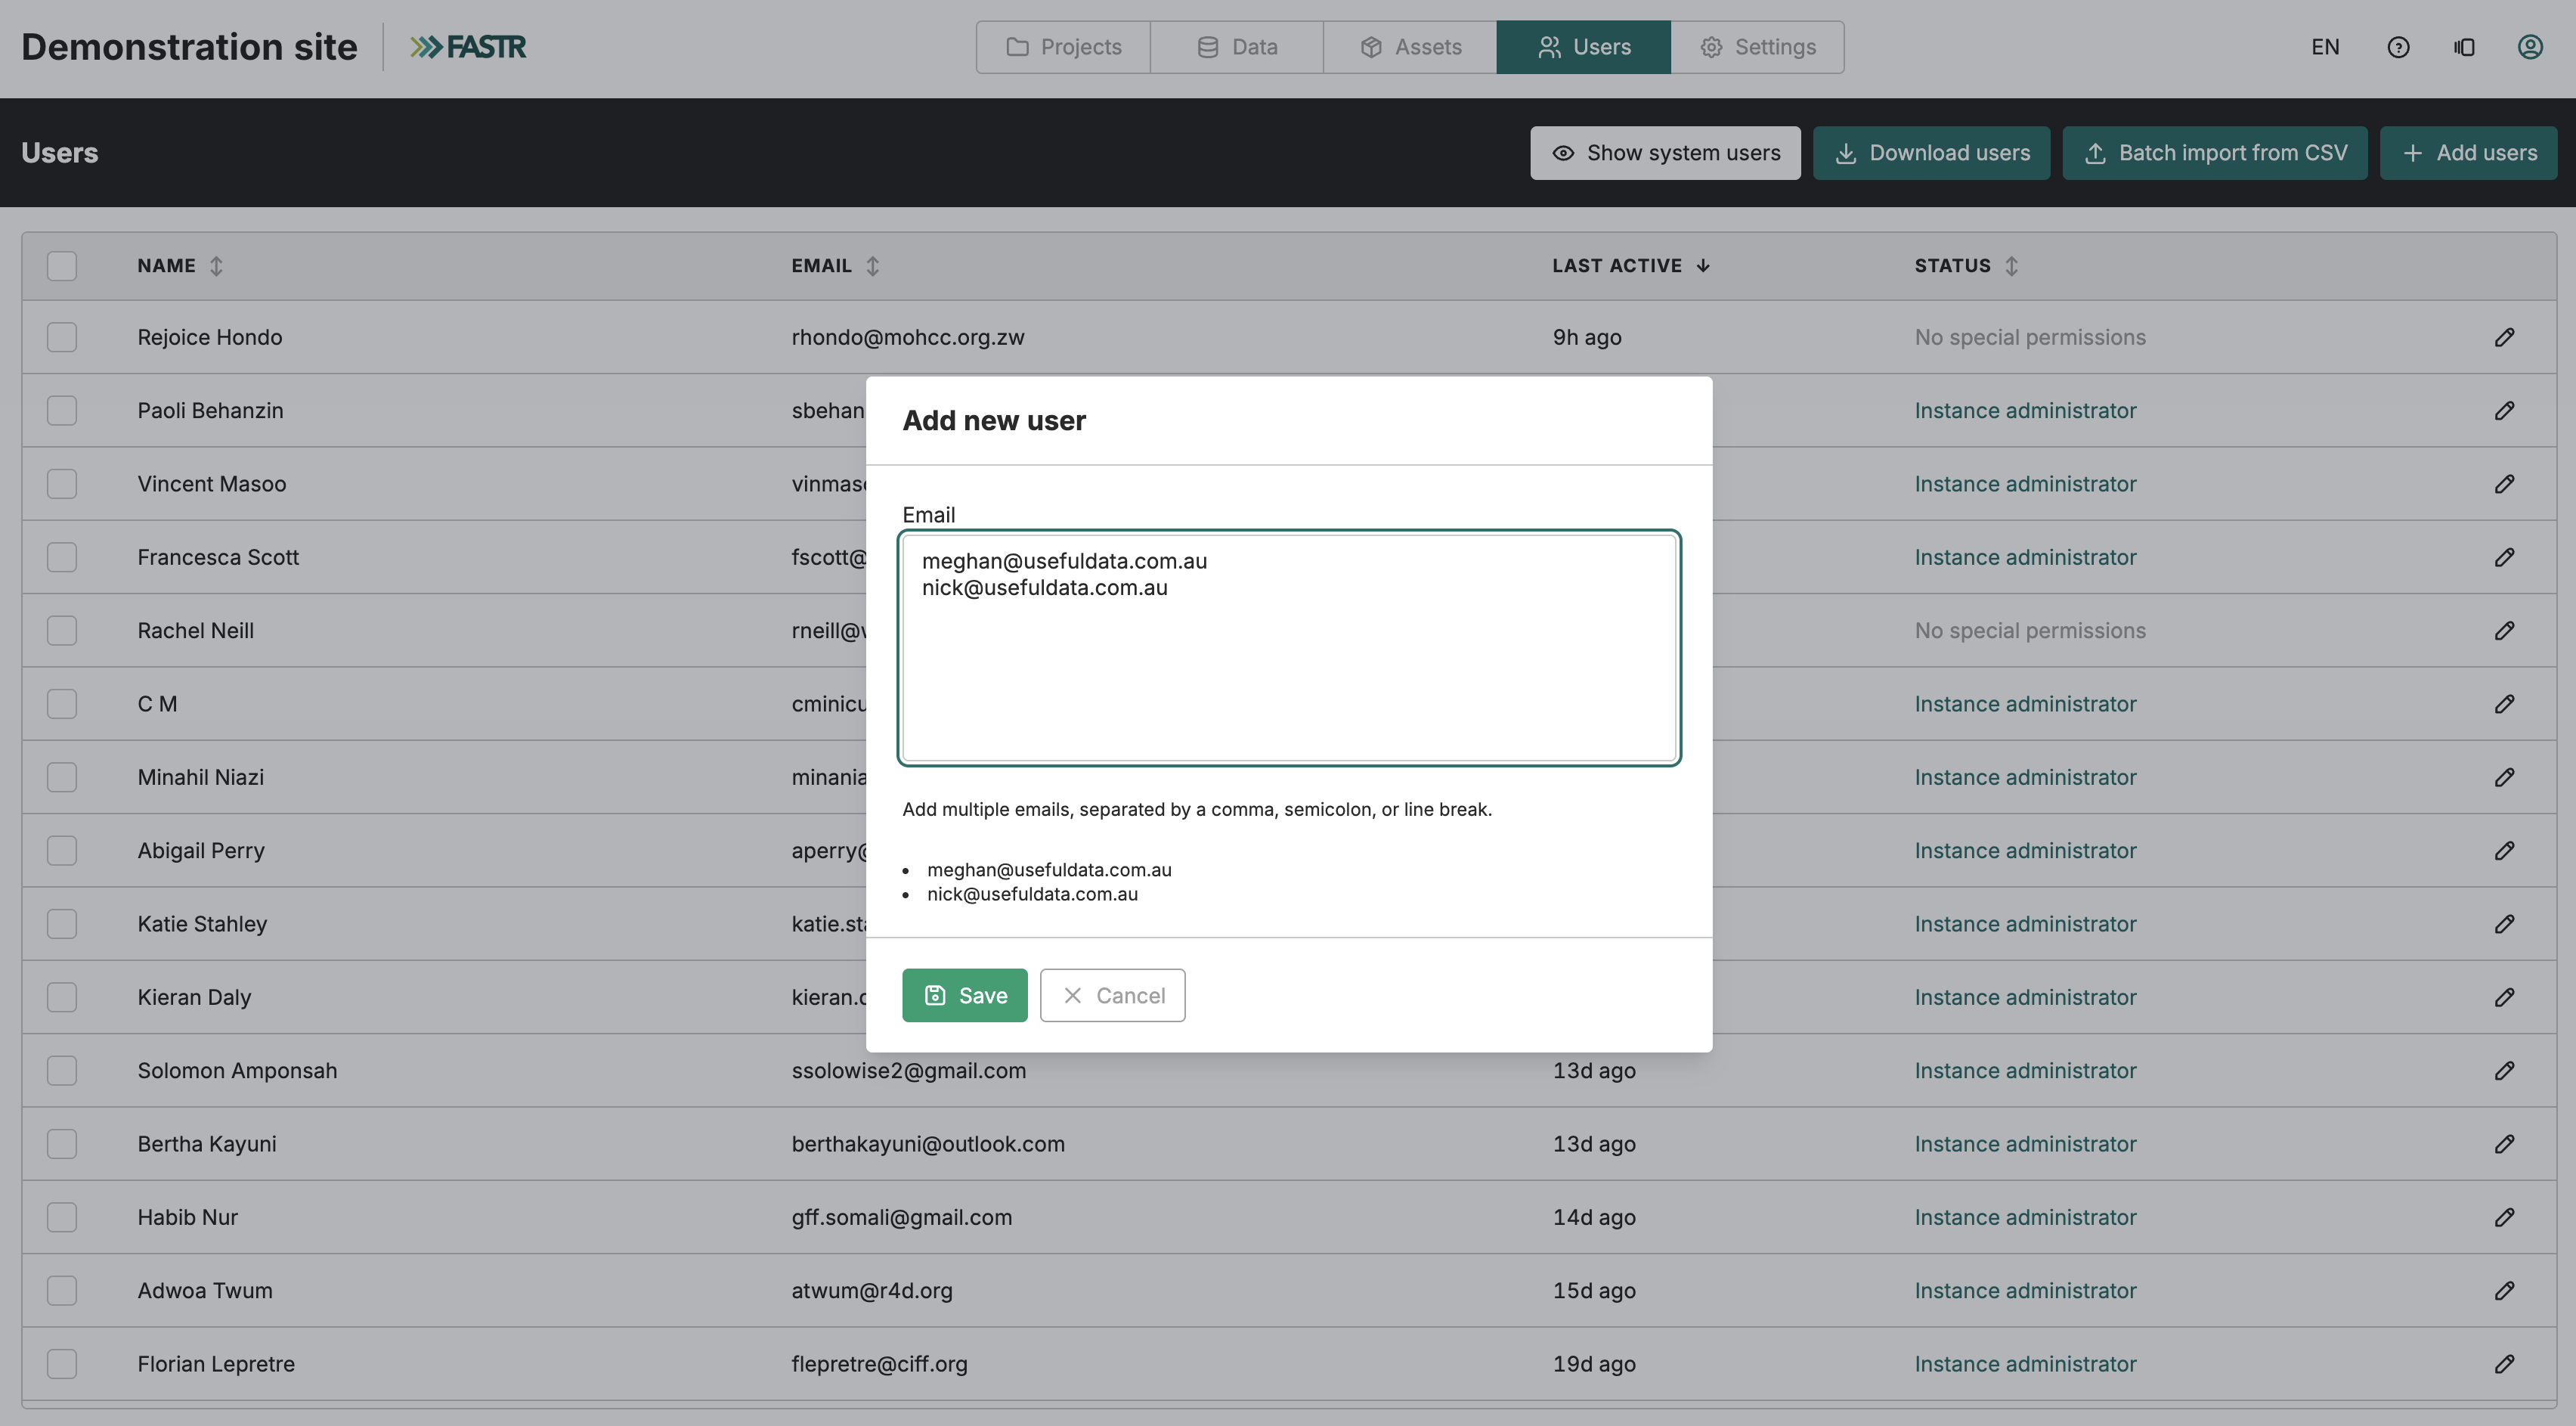
New users are created with no special permissions - they can log in but won’t see any projects or data until you configure their access. After adding someone, click on their row in the user list to open their profile and set up permissions.
For bulk onboarding, use Batch import from CSV to upload a file containing email addresses and admin status. The CSV needs two columns: email and is_global_admin. This is faster than adding users one by one when you’re setting up a new instance or onboarding a large team.
Changing a user’s email address
Section titled “Changing a user’s email address”Users can change their own email address from their profile. Open your profile by clicking your name or avatar in the top navigation bar, then find the Email address card. Click Change email to open the change email dialog.
The change applies to every FASTR instance the user has access to, keeping all permissions and history. The process has three steps: enter the new address and confirm the list of affected instances; verify the code sent to the new address; then review the per-instance outcome. If any instance could not be updated, the old address stays on the account and a Retry option is available. Once all instances report success, the page reloads automatically.
Administrators with the Configure users permission can also rename another user’s email address directly from the Users tab using the Rename email action. This performs the same fleet-wide rename without requiring the user to initiate it themselves — useful as a support fallback when a user cannot log in under their old address.
Instance permissions
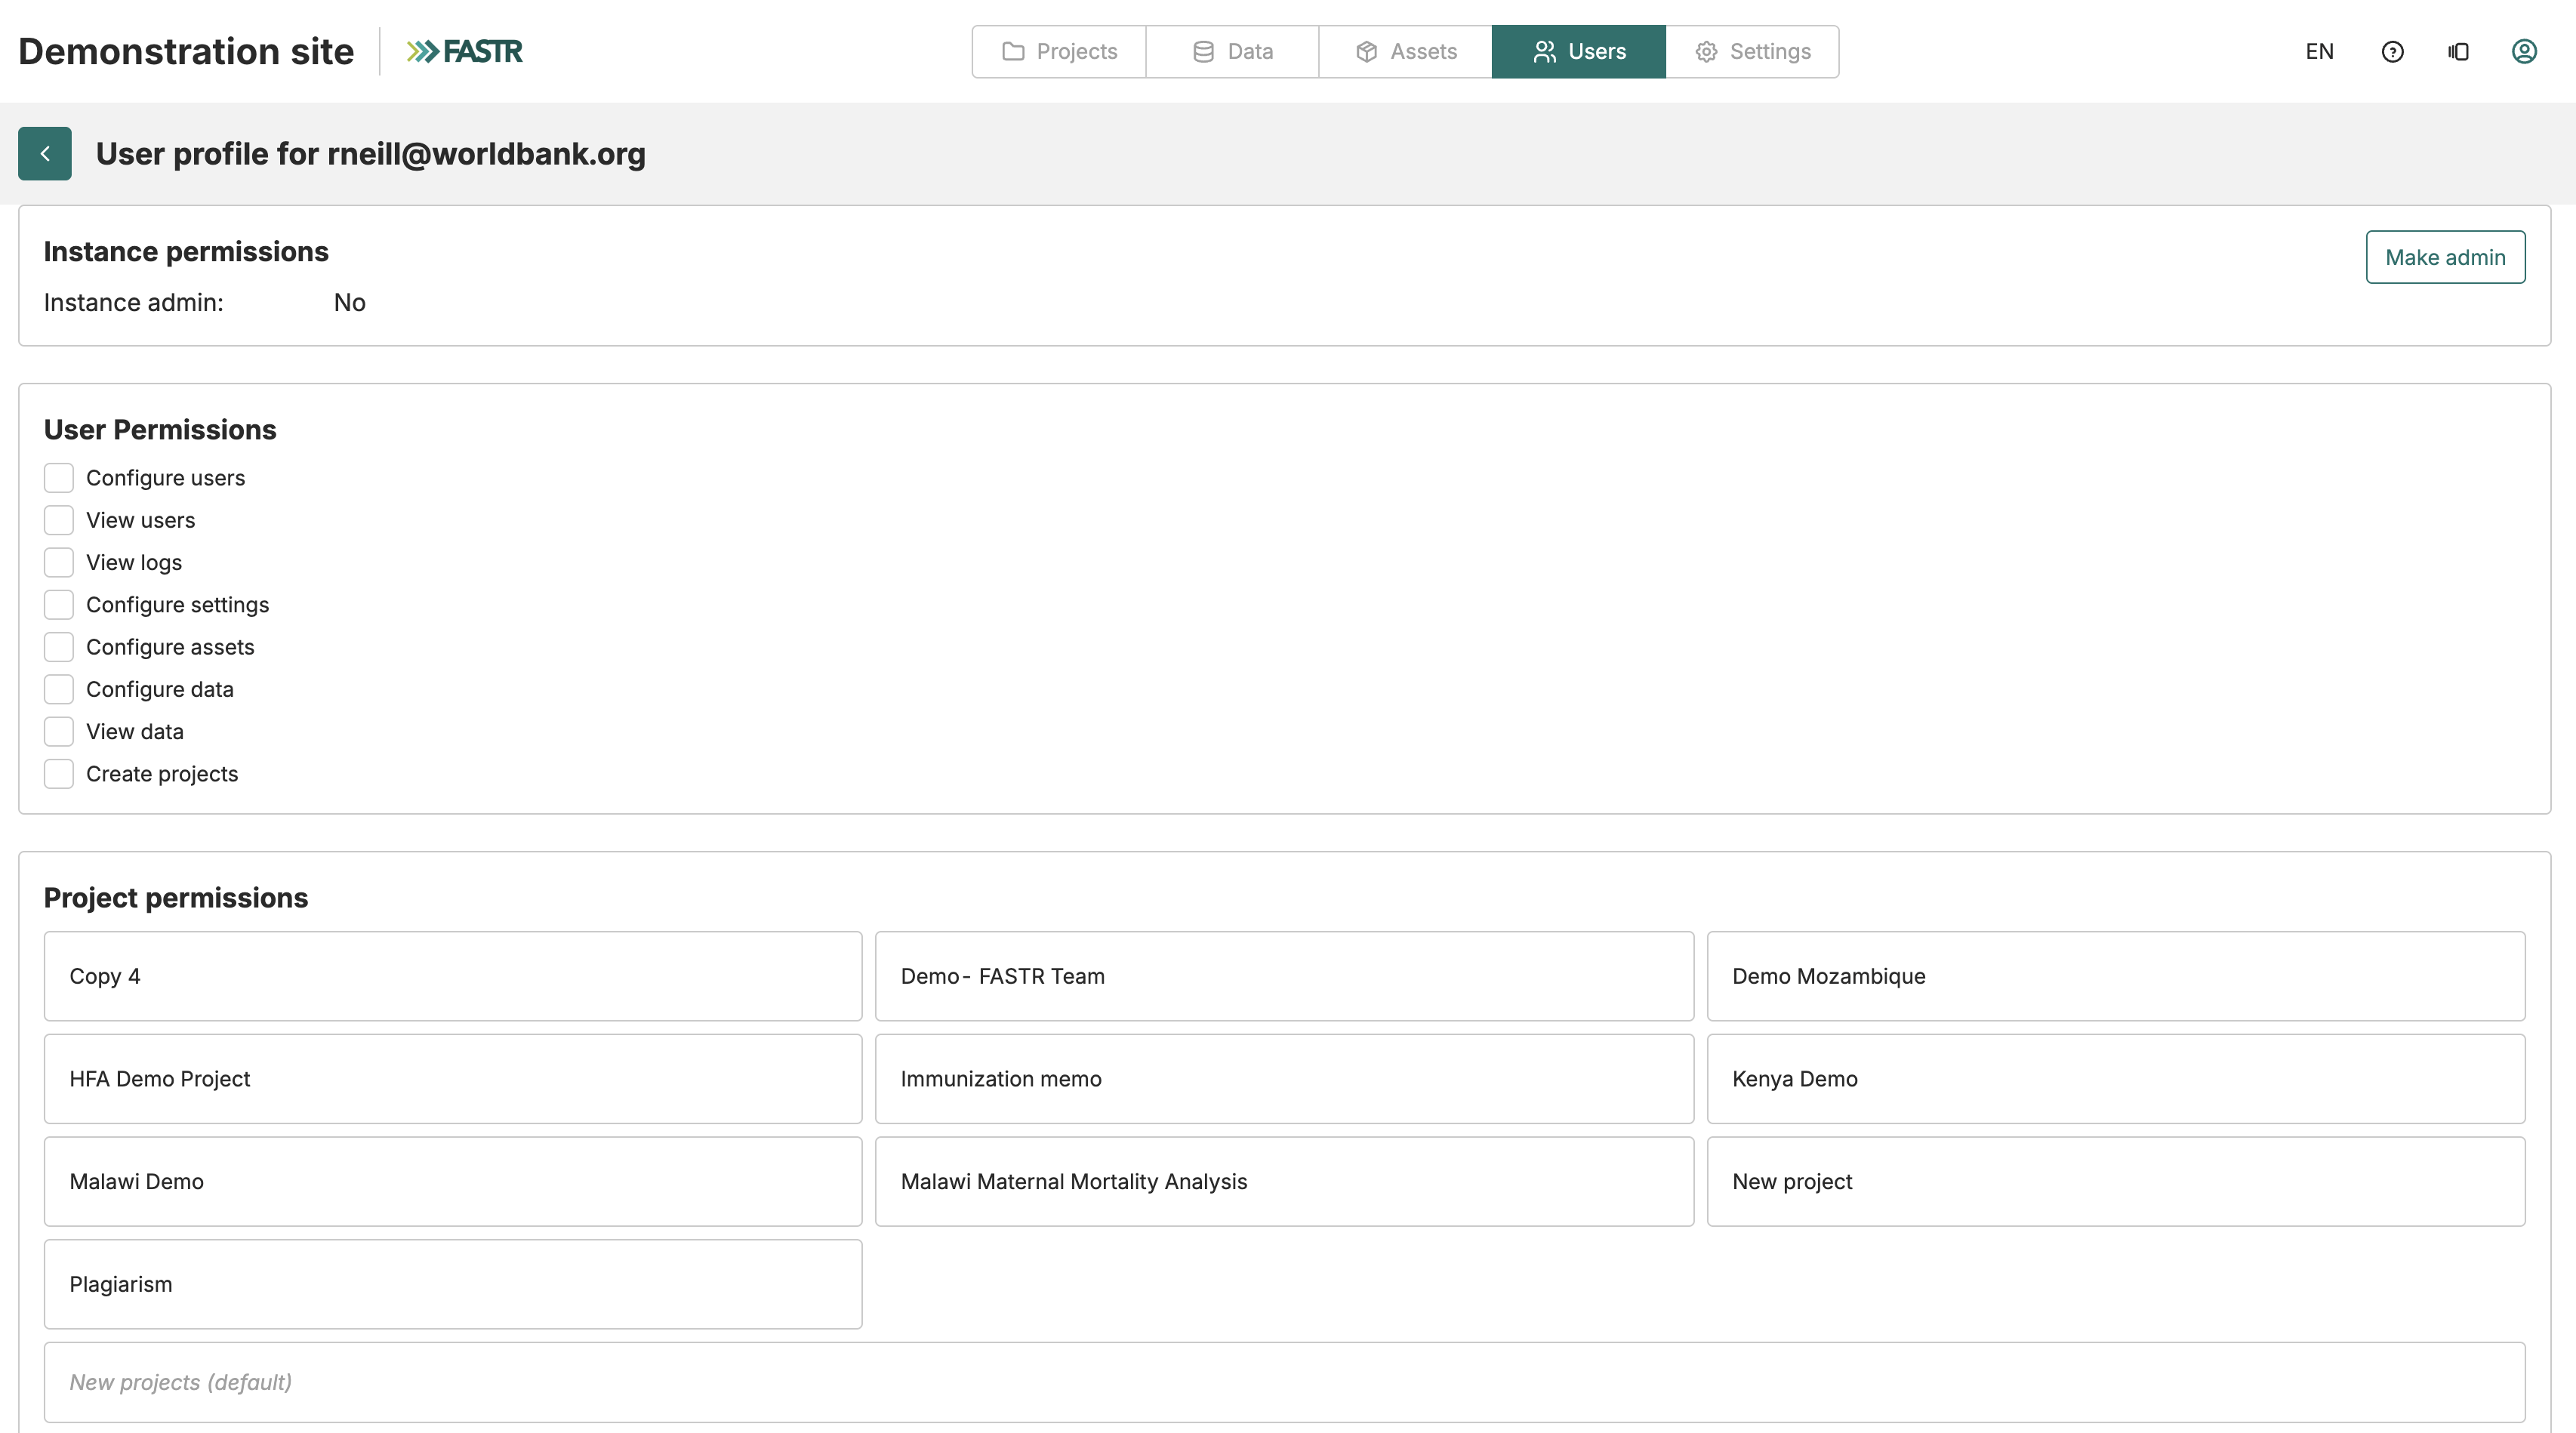
Section titled “Instance permissions”Instance permissions determine what someone can access across your entire FASTR instance. Click on a user in the list to open their profile, then scroll to the permissions section.
If you toggle Instance administrator, that user gets full access to everything - they can manage users, upload data, configure settings, and access all projects. Use this for people who need to maintain the platform itself, not for regular analysts.
For non-administrators, you can enable specific permissions:
- Configure users - Add, remove, and modify other user accounts
- View users - See the user list without making changes
- View logs - Access activity logs for troubleshooting
- Configure settings - Modify instance-wide configuration
- Configure data - Import and modify structure and datasets
- View data - Access data configuration pages without modifying
- Create projects - Start new analysis projects
Most analysts need only “View data” and perhaps “Create projects” at the instance level. Their main work happens within projects where you’ll configure more detailed permissions.
Project permissions
Section titled “Project permissions”While instance permissions control platform-wide access, project permissions determine what someone can do within specific projects. From a user’s profile, scroll to the project permissions section to see a grid of all projects.
Click on any project to open the permission editor for that user-project combination. You’ll see checkboxes grouped into three categories:
- Analytical Products controls access to visualizations, reports, and slide decks. “View” permissions let users see existing content; “Configure” permissions let them create and modify.
- Data & Modules controls access to underlying data and analytical processing. Users who need to understand methodology might need “View metrics” or “View script code” but not “Configure modules”.
- Project Administration covers settings, user management within the project, logs, and backups.
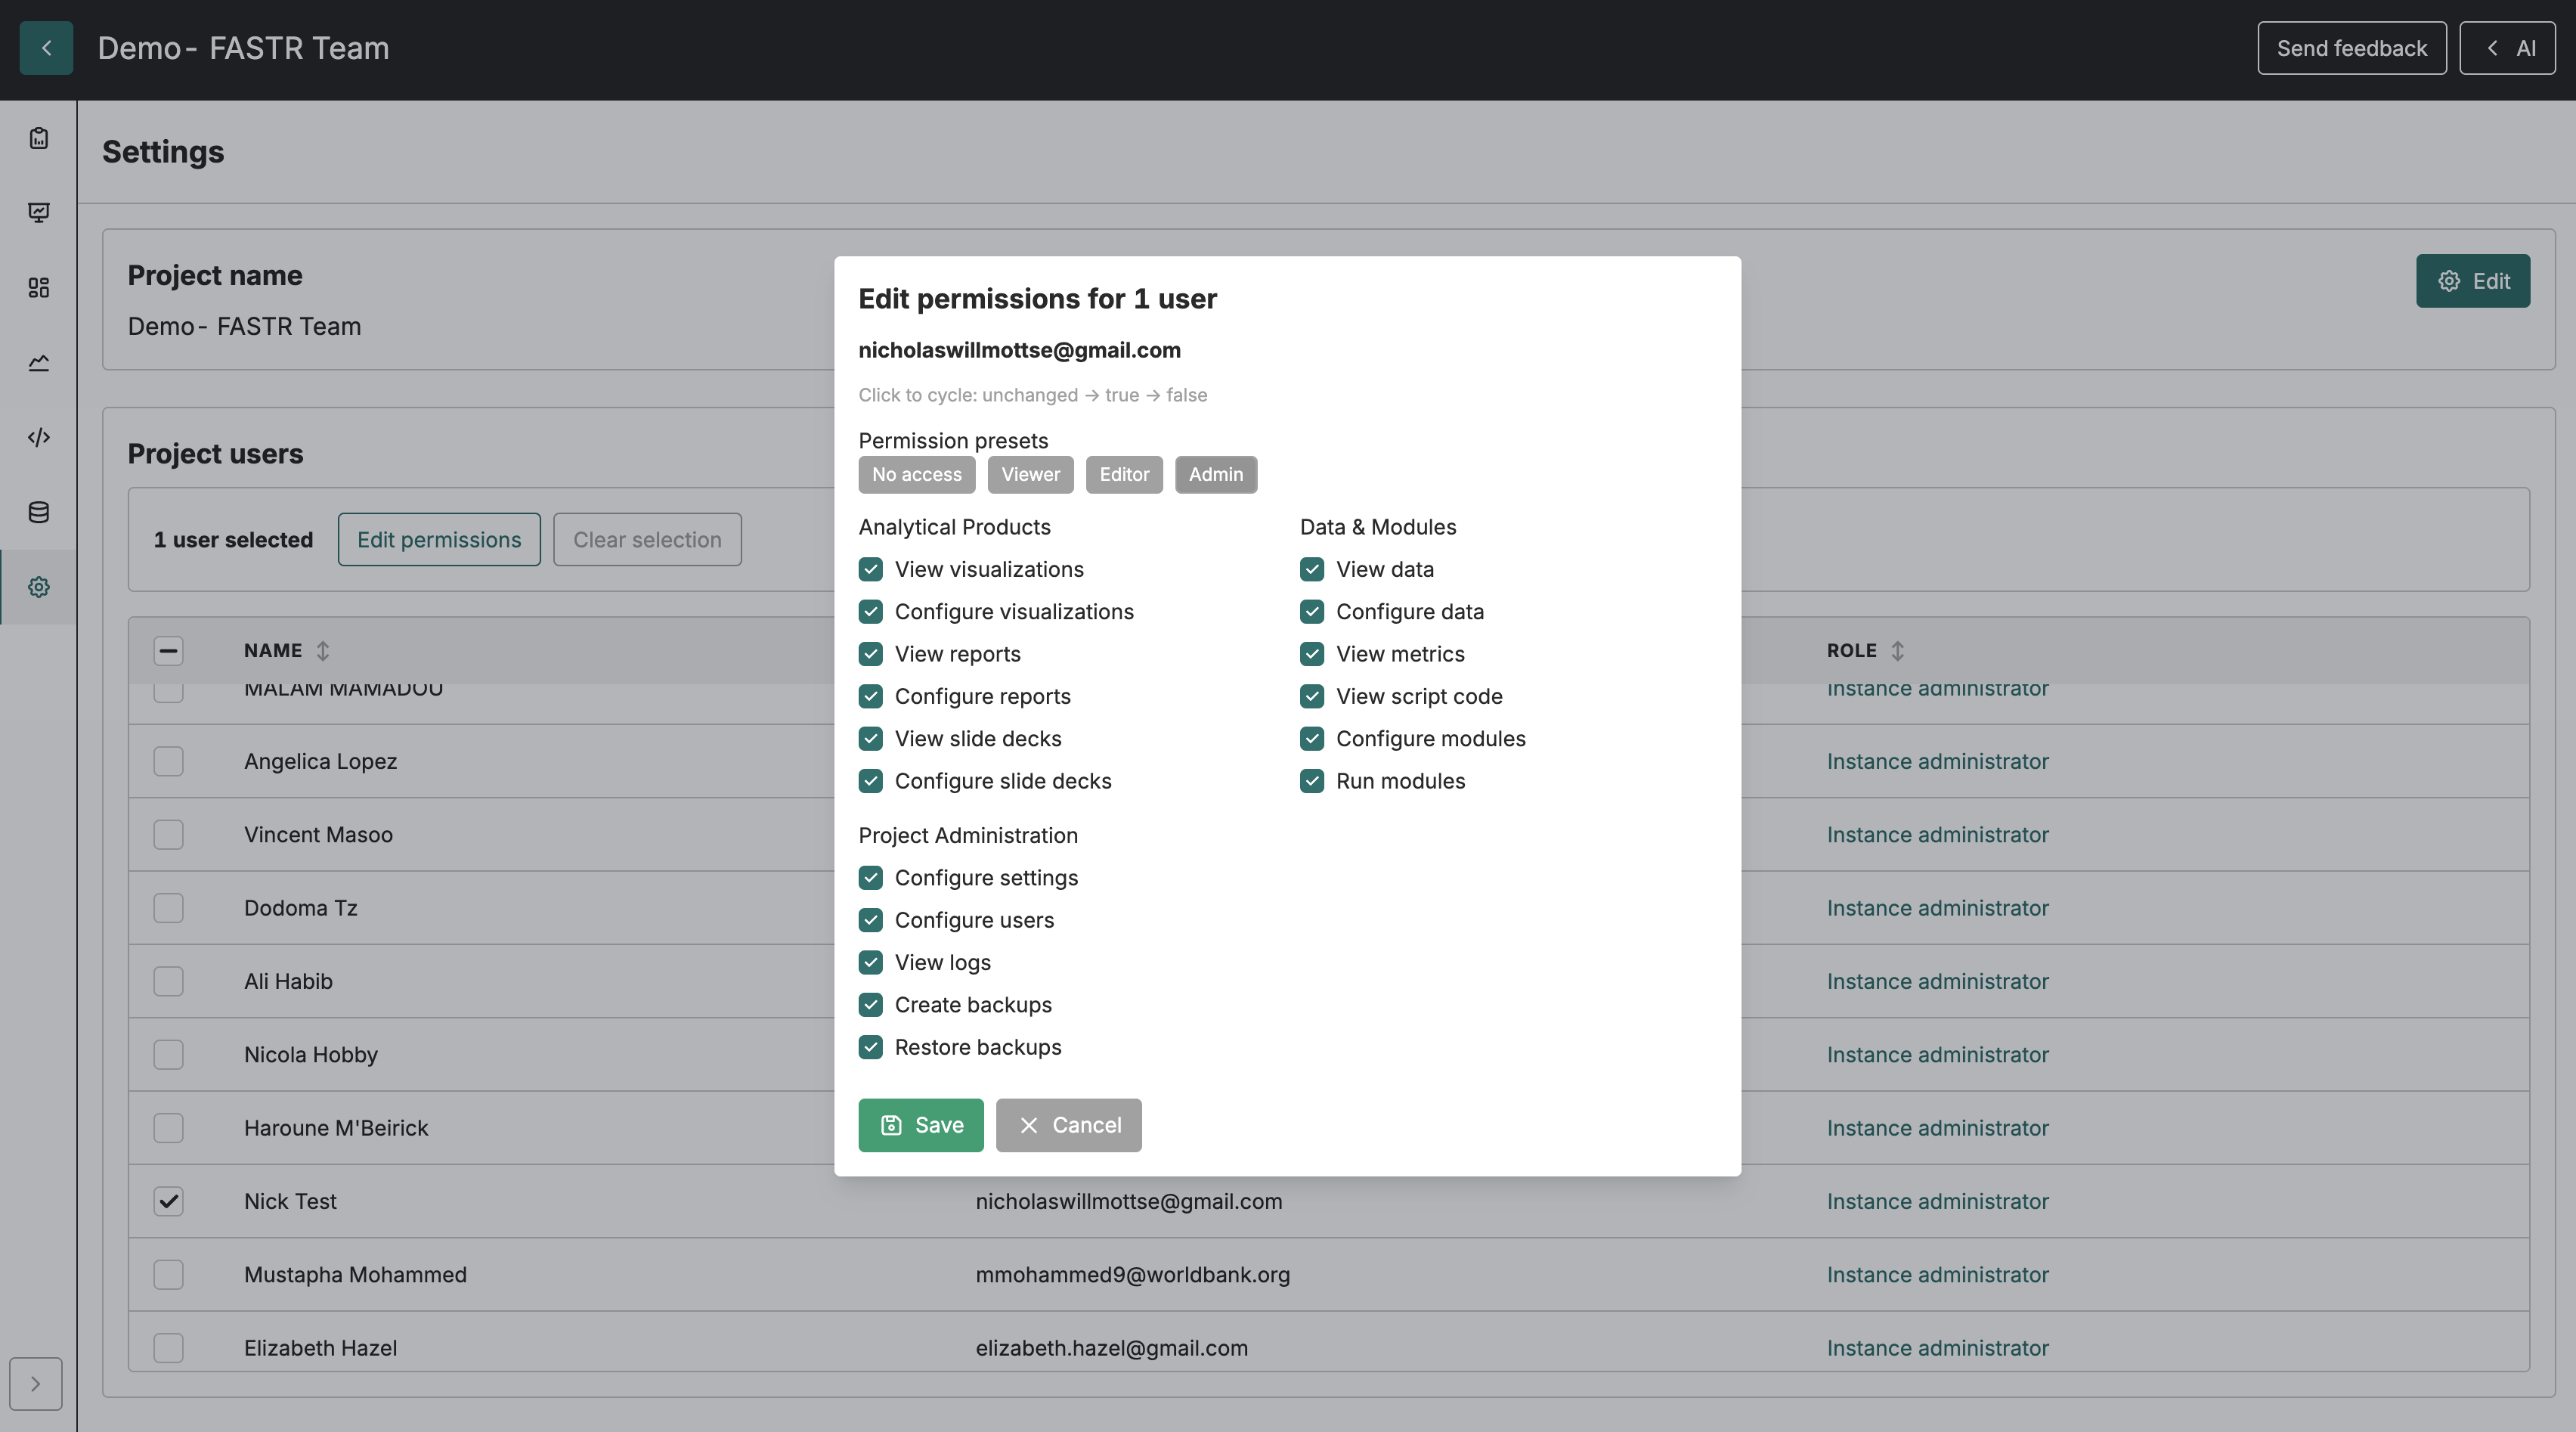
Rather than checking individual boxes, you can use the preset buttons at the top:
- No access - Removes all permissions (user won’t see the project)
- Viewer - Can view visualizations, reports, and data but not modify anything
- Editor - Can create and modify visualizations, reports, and slide decks
- Admin - Full access to everything in the project
These presets cover most common scenarios. Use custom combinations when you need finer control - for example, giving someone editor access to visualizations but not reports.
Default project permissions
Section titled “Default project permissions”When you create a new project, existing users get default permissions based on their profile settings. Click the “New projects (default)” button at the bottom of a user’s project grid to configure what permissions they’ll receive automatically when new projects are created.
This saves time when your organization adds projects frequently - you don’t have to manually assign every user to every new project. Set defaults to “Viewer” for people who should see all analyses, or “No access” for people who only work with specific projects.
Personal access tokens
Section titled “Personal access tokens”FASTR supports personal access tokens (PATs) for integrations and API access. From your profile, navigate to the Personal access tokens section to create, list, and revoke tokens. Each token has a label you choose when creating it. The raw token value is shown only once at creation — copy it immediately. A token’s last-used date updates each time it authenticates, making it easy to identify tokens that are no longer in use. Revoke any token you no longer need.
Personal access tokens are self-service: you can only manage your own tokens, not those of other users.
Bulk operations
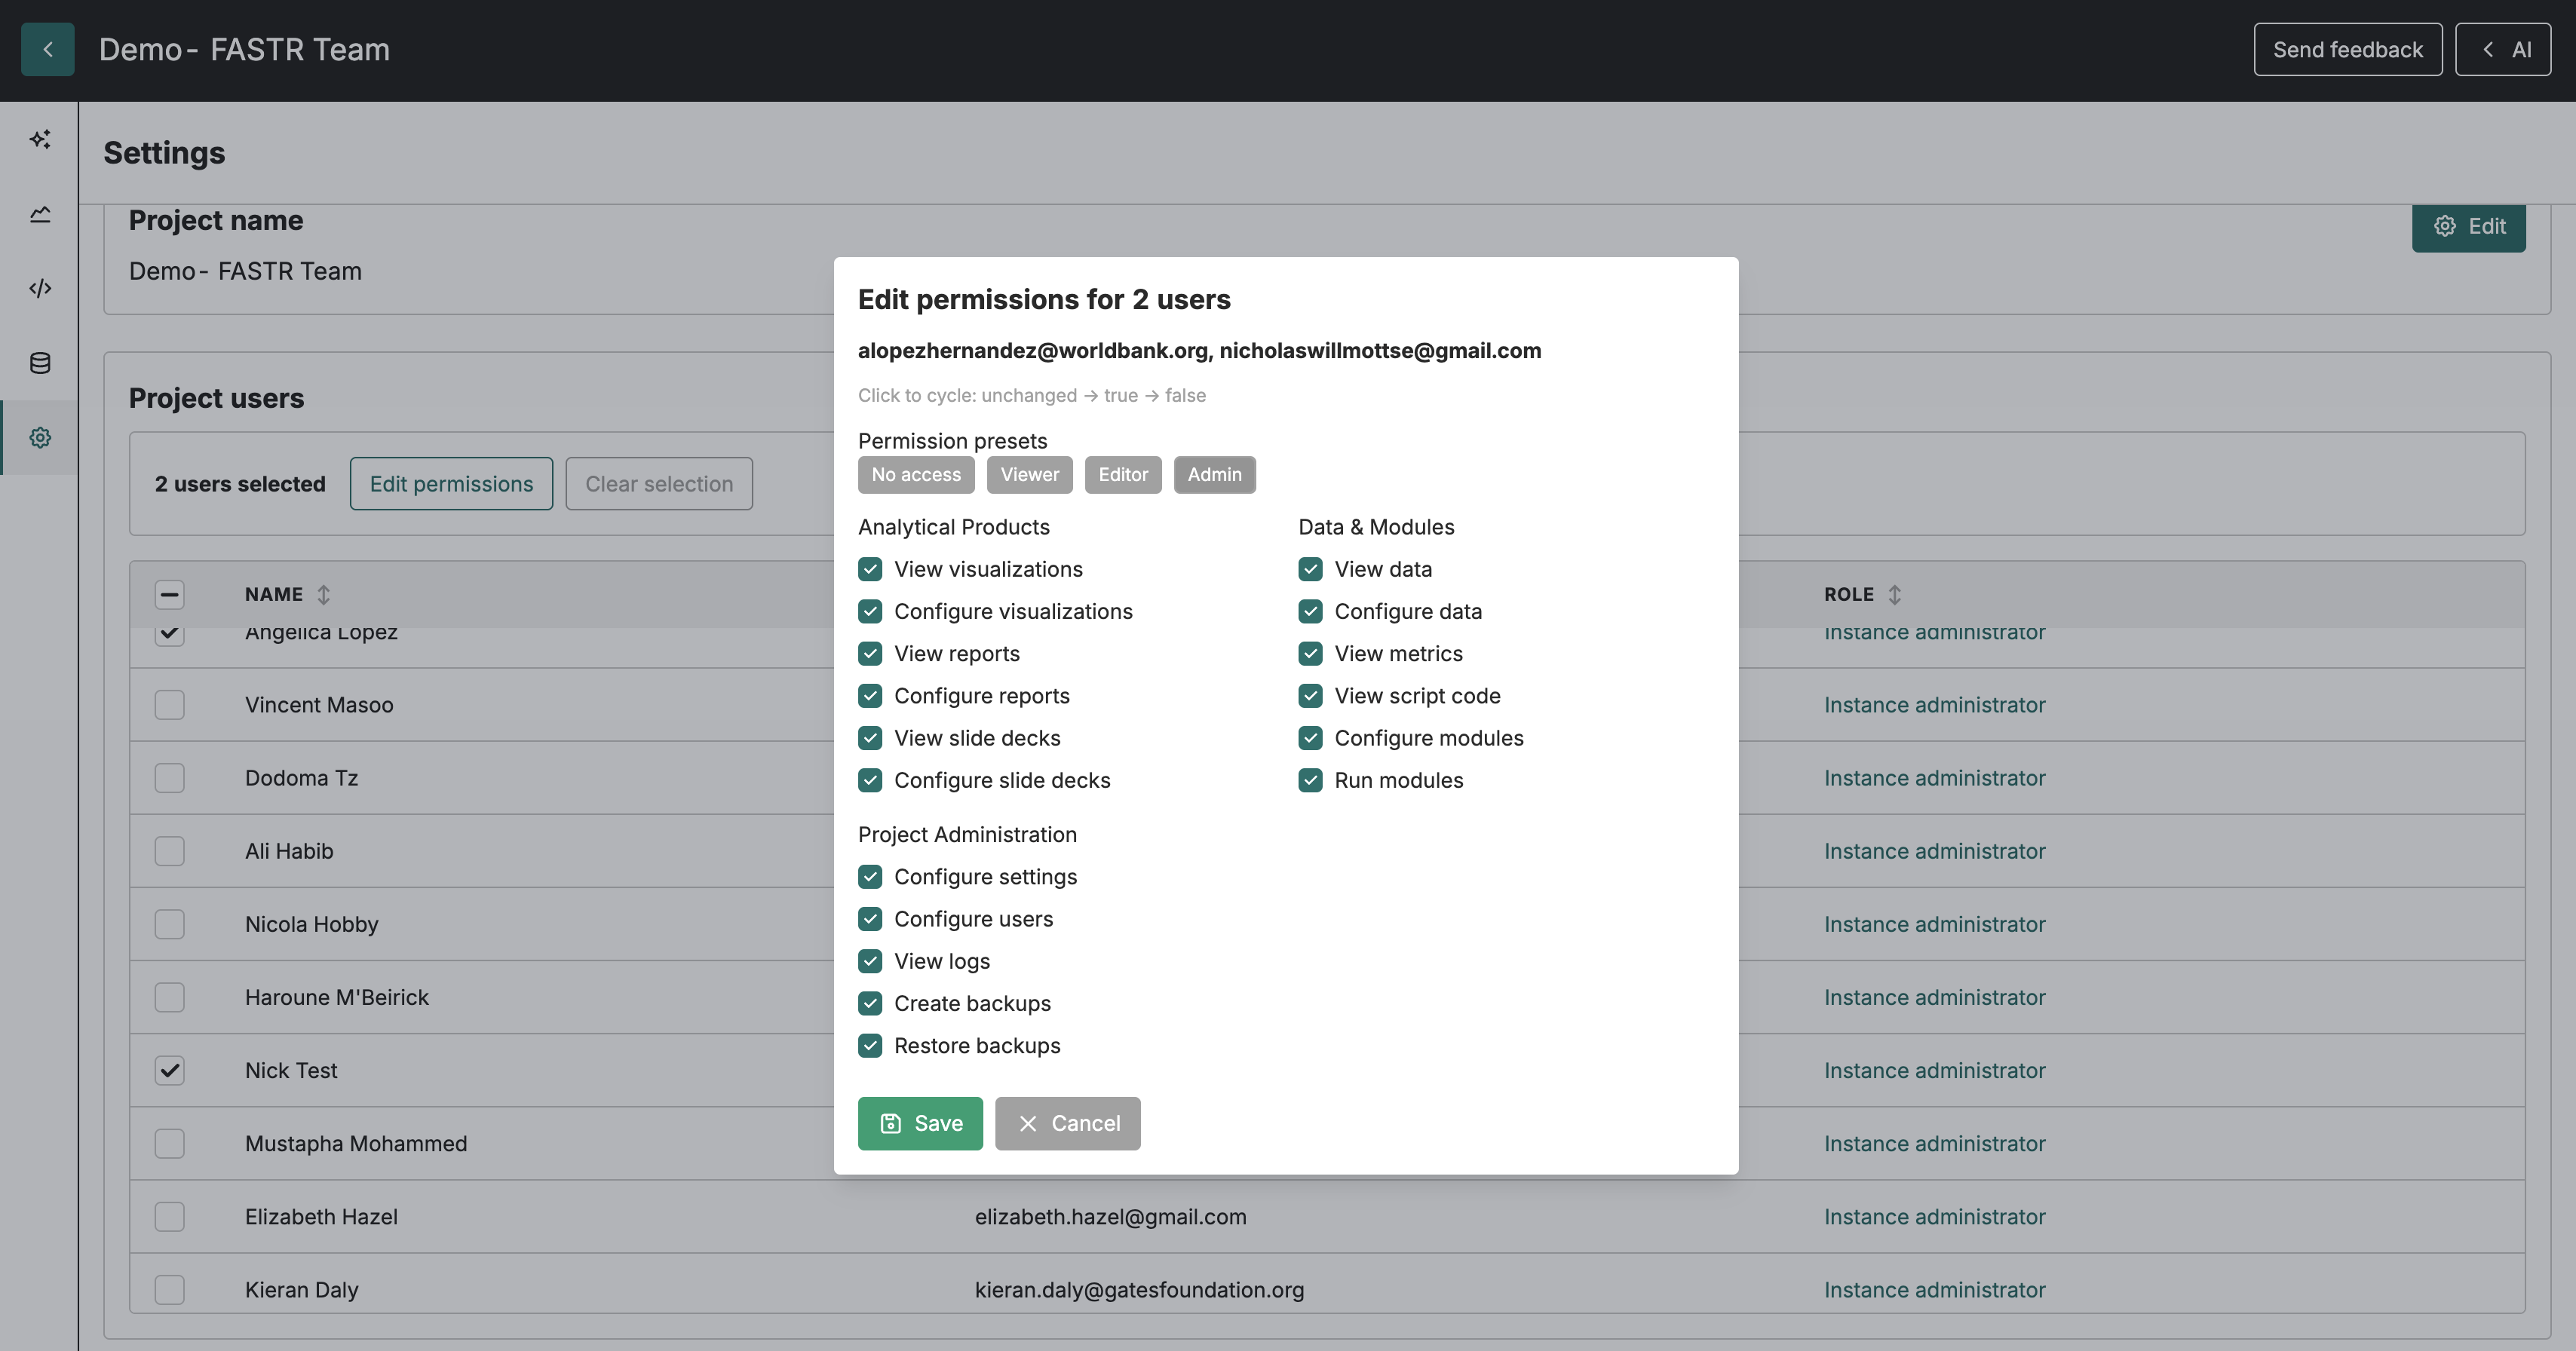
Section titled “Bulk operations”The user list supports bulk selection for common operations. Check the boxes next to multiple users, then use the action buttons that appear:
- Make admin / Make non-admin - Toggle administrator status
- Edit permissions - Update instance permissions for all selected users at once
- Edit default project permissions - Set what access selected users get for new projects
- Download users - Export a CSV of selected users
- Remove - Delete selected user accounts
Bulk operations are useful when onboarding teams or when access policies change. For example, if a new project starts and several people need editor access, select them all and update their default permissions in one step.
Removing users
Section titled “Removing users”To remove a single user, open their profile and click Remove this user at the bottom. For multiple users, select them in the list and use the bulk Remove action. Removing a user deletes their account and revokes all access immediately - they won’t be able to log in and any active sessions will end.
Removal is permanent. If someone needs temporary access suspension, consider setting their permissions to “No access” on all projects instead of deleting the account. This preserves their login if they need to return later.